Sunday, 13 February 2011

post 14 pre production documentation

The Script: This is used as a reference for all other documents within the pre production are based upon. It helps visualise the location, mood and character movement.


The Shotlist:
The Shotlist is a document which breaks down each individual shot and what happens in that shot.


Location Recce: The Location Recce is a visual display of the location where the filming shall take place. It informs the director of where lighting comes from and any power sources originally there. The director would use this document to decide wether or not to use the location or wether they should use it but make minor changes.


Actor profiles: These documents are what are provided to the director when actors audition for the role in the project. It contains basic information sauch as hieght, name, date of birth and other details. It will then go to list their previous acting experience. There will then be two pictures. One is a close up of the actors face and the other will be a body shot. There is also the actors contact details, if it isnt the actors details than it will be the actors agency. With this information and an audition the casting director can narrow down potential actors for the part and pass this information to the director.


The character profile: This is a general overview of the characters including their backstory.


The storyboard: This is a visual drawing and partial direction for each shot. It contains information about the length of the shot, the size of the shot, what the camera and actor does in that shot and what sound if any is heard or going to be heard.


Post 13 advanced production workshop 3


Understanding light and colour:


Light and colour can be characterised through its source. The source is where the light comes from and the intensity and colour of both the light and colour is what gives the image its texture and depth and if used correctly it can create different moods within the image.


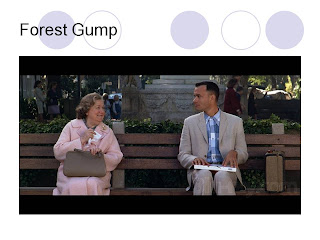
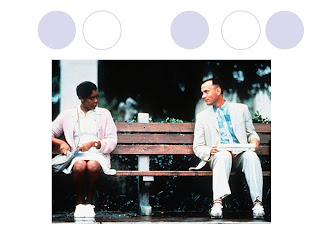
As we can see both images are very different in terms of lighting, with the image on the right using a lot of artificial light that is in front of the actors and aimed in their direction, whilst the image on the left uses very natural light with possible artificial light behind the horse in the background. With the image on the left the artificial light that is behind the horse is obstructed by the trees and the monument, making its effect very minimal. Because the light is majorly natural lighting there are no cast shadows or hard light resulting in a very soft light on the actors. The other image on the left is very different in terms of lighting. The hard lighting creates many attached shadows and loses the texture and detail from the shot, especially from Tom Hanks' suit where it dominates and drains colour from the shirt. Compared to the other image it has a much colder feel and texture to it.


It is a lot harder to use natural lighting regularly as the lighting always changes as the weather changes regularly. Therefore many films use artificial lighting to create continuity though out a scene in case the natural lighting does change throughout the filming.


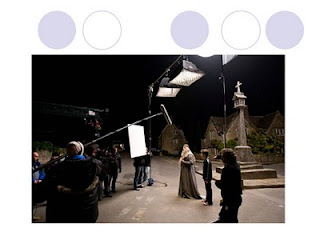
As we can see from this picture from 'Harry Potter' headlights are used to create the illusion that they are standing in a darkened street under and by some lampposts. By using soft lighting we as the audience assume there are lampposts nearby. The reflector is there to make sure no shadows take over the actors face and prevents the shadows from being dominant.


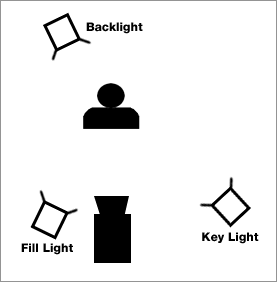
There are 3 main types of light that films use when applying artificial light.


First is KEY LIGHT. The purpose of this is to highlight the form and dimension of the subject. It provides the most dominant illusion and normally casts the strongest shadows.

The second is FILL LIGHT. This is simply used to reduce the contrast of a scene and provide some illumination for the areas that have a shadow. This is normally perpendicular to the key light.


There is also BACK LIGHT. Although not used often this is where the light and the audience are facing each other and the subject is in the middle. This can cause the subject to 'glow' whilst other areas remain darker.


Using the three different lighting together is what makes up three point lighting. By using three point lighting the photographer can illuminate, control and add shadows to the subject, giving the photographer complete control on how they want to illuminate the subject.

(From left to right: key lighting, fill lighting, back lighting.)


From this picture we can see that by using three point lighting this kettle is illuminated much better than by using the individual lighting.


Lighting and creating an atmosphere:

As well as illuminating a subject, lighting also helps create an atmosphere in a scene. If you are trying to create a scene of happiness you will use lots of bright light, allowing lots of colour to flourish, rather than dark lighting. Special attention has to be taken when applying lighting and using it to create atmosphere as too much or too little can ruin a shot.


Here we have to different images, both trying to pu across different atmospheres. The image on the left uses very harsh lighting on the floor and walls, helping create distinctive harsh lines to the aresa just illuminated and also allows a slight diffusion, adding more to the errie scene. This would be something you would expect to see in a horror movie. The second image uses the reflection from the floor to illuminate the corridor, however because of the dark colour of the corridor walls the lighting doesnt do much to lighten the mood of the scene.From both of these pictures there are very different atmospheres emitted, with the lighting proving pivotal in creating the atmosphere.


After understanding how lighting helps create an atomsphere, as a class we performed an experiment using artificial light and natural light. We decided to shoot two different shots of the same scene, however one scene was artificical lighting and the other was natural lighting.

This was the final product-http://www.youtube.com/watch?v=EpDT6G1C6Gc

In one shot we used botht the artificial and natural lighting, then in the second we got rid of the natural lighting and used the artificial and manipulated it to create a different atmosphere to the shot. From the first shot you can tell that we are using as much light as we can get to illuminate the hallway and it looks like its a very sunny day thats getting reflected through windows.

The second shot however is completely different. We blocked out the natural light, which proved to eba slight probelm as the windows around the corner were hgue and required a few people to hold up sheets and block the sun. We then altered the brightness of the spot-lights on the ceiling and twisted them to face our subject. By doing this we had created a much more mysterious atmosphere, and by focusing the lights just above our subjects head it gave us shadows across the face and added to the tone of the scene.

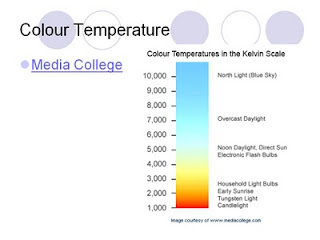
We also learned that there is more you can do to lighting than by positioning and removing light, you can also add gels, filters and colours. However when using this you must get the misture of light and the colour of gel or filter right. This is when the lighting technician uses the colour tempreture scale. This is what is used when the director is trying to balance out the light in the shot to get the reguired effect.


Another method of manipulating light is through gels. These are transparent coloured polyester or polycarbonate sheets plced over lights. They help change the feeling the light gives off. For example if you use a red gel the light will give off a warmer feel, whilst if you use a blue gel the feeleing will be colder. However this method is an expensive one and also requires a experienced team to work properly.


There is also the use of filters. This is when the light entering the camera lens is altered. Using a filter can sharpen, add colour, flare, affect contrast and the light intensity of an image. You can use filters individually or in a combination. On the left is a demonstration what happens to an image when applying red 85 filter. As we can see by applying the filter the image has become warmer. This is done by tricking the camera into thinking the light blue in the picture is white.


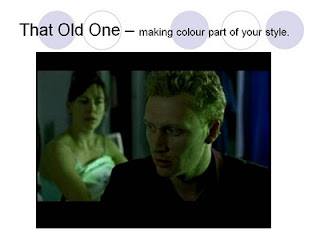
Finally there is also the application of colour. This is simply when a colour is placed over the image to change the mood of it. As we can see in the image below the editors have placed a green tinge over the shot. This actually has relevance to the film as the green becomes a symbol of when the man lies to his wife. We see the green throughout all the scenaios in which he tries to come up with a good lie to tell his wife.


Post 12 advanced production skills workshop 2

Quality experiment:

Quality in terms of lighting is how the intensity of the illumination effects the mood of the image and the visual impact it gives off. There are normally two distinctive qualities- Hard and Soft.

Hard lighting is a direct light that creates bold shadows, crisp texture and edges. This creates some very bright and dark areas within a shot and can give a very artificial look to the subject.


Even though this picture doesn't give of a artificial look, it still has distinctive bold shadows and distinctive lighting on the face.


Soft lighting is indirect or diffused and blurs contours and textures. It creates a softer constrast between light and shade. As we can see from the image the light looks very natural and has very light shadows.


There is also 'flag'. This is a material used to shield the camera lens from unwanted light.


As a class we were told to perform an experiment in which we tested different qualities of light to see what works best and looks the best and most effective. This would also help us in our short film as it would allow us to be more creative in our lighting. We began by looking at Madonnas music video 'vogue'. This music video was famous for using film noir style and using shadows to create the mood of the video.


From both of these pictures we can see there is use of hard lighting, which isn't giving a lot of detail to the subject. If you look at the first picture we can see the intensity of the light and not much detail. We can just see the outline of the shoulder blades however the lighting is very dominant. The same can be said about the second picture with there being a lot of hard light and not much detail shown as a consequence.


This lead us onto our main experiment. We were told to allocate ourselves roles, however as there were only four of us we had to multi-task. The roles included:


  • Director


  • Cameraman


  • Clapper operator


  • Recorder


  • Gaffer


  • The model
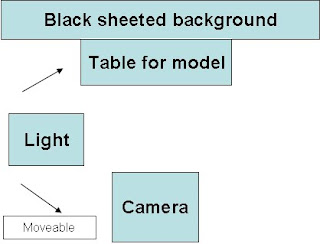
We each took it in turns to be each role, allowing us to gather experience and knowledge of each job. Our experiment was set-up like so:


We also had a large amount of equipment for this experiment:


  • Mini DV Camera


  • Tripod


  • Batteries


  • Base Plate


  • Tape


  • 1x Lowel Pro 250w lamp


  • 1x Stand


  • Diffusion attachments


  • Speed ring


  • Black Sheet/Card


  • Scissors


  • Safety gloves


  • Extension leads


Altogether we have 4 different shots in which we manipulate the intensity of the light and use different diffusions and lighting equipment to change the light.

This is the first clip. This shot included us using black sugar paper and diffusers to manipulate the lighting.
http://www.youtube.com/watch?v=jXIq6afyZsA&feature=related


The second clip is were we used barn doors on the actual light to direct the light, bounce the light off the ceiling, tin foil and white paper. We also used ventian blinds. These were created by cutting lines in some black card and then being held up to the light.
http://www.youtube.com/watch?v=1bm4kDecXLs

This is the third clip. This is where we applied Spot and Flood to the lighting.
http://www.youtube.com/watch?v=xXkmNhGYA-0

The fourth clip is where we changed direction of the light to see what difference it made to the shadow and subject.
http://www.youtube.com/watch?v=3YdFyF5wkoc&feature=related


After watching the Madonna music video, learning about the different types of light intensity and conducting our own experiment I can say that I have learned a great deal about how lighting affects the feel of a shot and the tone of the film as well. By using lighting affectivley on its own you can create a mood equal to possibly the dialogue that is actually spoken. The experiment had its own strengths in that we as a group learned different roles and learnt more about different roles and how they all work together within a film production. I think it will be very beneficial to think about lighting when it comes to filming our short film as it can help create different moods so easily.


post 11- film style and film noir


When we were looking at creating our short film a question that did arise was what style would we apply to our film and how. Our class looked at different ways to create a style, for example altering the lighting to a certain way creates a style of its own. This lead to film noir, a sytlistic talent and iconic style.

Film Noir basically means black film/ cinema and was first applied by French film critic Nino Frank in 1946. It was used to describe the dark, downbeat and black looks and themes in many of the American crime and thriller films of the 1940's up to the late 60's. It apparently reflected the mood and tensions of a post world war / cold war America. It reflected the fear, despair, mistrust and paranoia. It became particularly synomous with stylish American crime dramas that explored cynical attitudes and sexual motivations. Some famous examples include Double Indemnity, Femme Fatale and Psycho.

The films themselves revolve around heroes, who are flawed and cause you to question their actions. These characters where often described by critics as aliented from society. There are certain stereotypes that were portrayed such as the hard boiled detective, corrupt policeman and femme fatales amongst many others. The most intriging characters seemed to be the femme fatales with thier seductive charm, beauty and double dealing actions.


http://www.youtube.com/watch?v=hn-RWYZYbsY&feature=player_embedded
This is a clip from from Double Indemnity. It shows how film noir uses lighting to manipulate the mood of the scene and to illuminate the woman's seductiveness. After watching this clip we were then taught how to arrange the lights and how to use this skill to create a film noir style. We then learnt about the different shadows that you can make from manipulating the light.
There is the attached shadow. This is where a shadow directly defines a form. As you can see in the image on the right, the person is standing in front of the source of light and the shadow is attached to the perosn and is a reflective form of that person.


The second is cast shadow. This is when the object blocks the light, normally the object is right by the source, and causes a shadow to be cast. As you can see on the image on the left the ball is blocking the source of light, causing a shadow to be formed or cast.

If you look to the at the image from the film Psycho we can not see the mans face. This was cleverly done by positioning the light source away from the actor. This helps create a shadow and keep him dark and mysterious. This is one of the advantages with film noir. It allows you to create a mood without using special effects, distract the audience or hide a characters identity. All of these things can be achieved by adjusting the lights.


After learning and understanding about film noir and how it can create a sense of style for our film we looked at how it looks on textures and objects. We then moved onto applying this knowledge to the practical side of things. Firstly however we looked at a previous practical demonstration which used a lemon.
http://www.youtube.com/watch?v=G-nBjFze-J4
In that video we can see that depending on where the light is and the intensity of light, it can give off a varied impression of the lemon.

We were then told to experiment with our own object which was a skull.
http://www.youtube.com/user/MrsShipp100#p/search/0/SNQefCdWxnY
We were given a torch, a black sheet of paper to use in the background, a camera and our skull. As we moved the torch around the skull we got different textures and shadows, all depending on where and how close we put the torch to the skull.


post 10- Job Roles Research

Job Roles research:
As with any project there are certain roles which people need to take, each with different roles within the project and each contribute accordingly. I will be looking at the different departments that help create a film and the different jobs within the departments.

DIRECTION: This department is perhaps considered most important in any media production as without it, the project wouldn't happen. Perhaps the most known person of this department is the director himself. This person is responsible for the creative direction and overall vision of the film. (Beneath the Coen Brothers, famous directors for films such as No Country For Old Men)The director however is not alone in this as there is support for the director.
-The First Assistant Director : This is the directors 'right hand man' who takes on tasks that the director doesn't have time to deal with, allowing the director to focus on the creative aspects of the film.
-The Second Assistant Director: This is the first assistants 'right hand man'. Their main responsibilities are to draw up call sheets and making sure the cast are where they should be at the correct time.
-The Third Assistant Director: This is the person who helps the first and second assistant directors in whatever way possible on set or location. They normally deal with the extras and coordinate them, making sure they are doing what they are meant to do.
-The Floor Runner: This is the opening level for anyone on the production team, many directors start off as runners and work their way up the chain of command. They do whatever errands they are given such as conveying messages, looking after the crew and cast or transporting equipment.

CAMERA: Having good cinematography always helps the creative aspects if any film. Having unique cinematography helps define and make a film its own, setting it apart from anything else. The director of cinematography has the job of manipulating light and shade, using different shot compositions and different camera movements to help the audience know more about the character than perhaps dialogue can.
-The Director of Photography: This is the head of the department and holds one of the most creative roles in the film. These are requested to be part of the film by the director, however however the studio and the financiers must approve of them before they can join the team. The director of photography works incredibly closely with the production designer and director so they can finalise the visual style for the film.
-The Script Supervisor: This person works with the camera department making sure that everything that is filmed makes coherent sense with the script.
-The Camera Operator: These have a vital role within the production of the film. These are the people who have to follow the directions of the director of photography incredibly accurately, making sure they get the correct shot composition.
-The First Assistant Camera- These are the people who make sure that character stays in 'focus' by 'pulling focus'.
-The Second Assistant Camera: These are the people who are responsible for the smooth running of the camera department. They were formerly known as the Clapper Loader.
There are many other members of the camera department who either help film in special scenarios such as underwater or from incredibly high angles or who help construct or manage the equipment needed such as the grip and crane operator.
The Lighting Department: This is a very important department as it helps establish the mood of a particular scene, a certain atmosphere or just making sure the actors are seen appropriately in the scene. The director of photography is in charge of this department. There are several specific jobs which are vital to the running of the department.
-The Gaffer: The Gaffer is in charge of all electrical work on the production. They are in charge of a team of electricians who set up and install all the electrical equipment such as lights and power supplies.
-The Best Boy: This is considered to be the best electrician in the gaffers team. The best boy coordinates a team of lighting technicians and deals with the logistics and paperwork.
-The lighting technician: They help provide the relevant lighting and power supply for the project, whether it be in a studio or on location.
-The Moving Light Operator: This is the person who operates the automated lights which are chosen by the director of photography.
Production sound: Even though a film is associated with being a visual masterpiece, it cannot be truly great it there is no sound to accompany it. There is dialogue and other noises that are essential to a story and how it is told.
-Production Sound Mixer: This is the person who is responsible for recording the sound during filming and also has to make sure that the sound is of a decent quality.
-Boom Operator: This is the person who is in charge of placing the microphones so that they can get the best sound. However they must be careful not to get in the way of the camera operation or the actors freedom to act.
-Sound Assistant: These are the people who provide general back up and support for the sound mixers and boom operators. They have to make sure they have the correct stock and make sure the department runs as smoothly as possible.
Art Department: A film can be set or located anywhere. The art department has the job of making this world be seen as realistic as possible both to the audience and to the actors, whether they are in a ice palace or in the wild west. A great deal of work is put into making sure the location or set looks appropriate.
-Production designer: These are responsible for the entire art department and play a vital role in helping the director achieve their ideal visual style. They also have to carefully calculate schedules and find ways of making the film within an agreed budget and within a specific time. They have to make sure they can attract the audience with the setting of the film and put lots of time in the pre production giving them the best opportunity to.
-Art Director: They act as project managers for the art department. They help make and design the production designers creative vision for the location and eventually help create the films visual uniqueness. They are also responsible for the art departments budget and the working schedule.
-Set Decorator: Although this isn't the biggest job it is still vitally important for the art department. They are responisble for providing anything that furnishes a set.
-Storyboard Artist: They are responsible of transforming a written screenplay into a series of illustrations that depict the screenplay. This is extremley helpful as it helps the directors know what they want to achieve and also helps the art department know what they will need to make or provide for the location or set.
Applying these jobs to my own project:
Having noticed that these jobs require many different people to fufill these roles and with my A2 class having 5 people in the class, I came to the conclusion that within my group the jobs and responsiblites would have to be divided between the members of the group. As there are only 3 people in my group I believe that the roles should fall accordingly:
Person 1:Director. I believe that whoevers film is chosen should remain directoras it is their original vision and no-one would have a true understanding like they do. They will also more likely be involved with chosing the location, as they originally visualised where the story will take place. They may also be deemed as head of the other departments such as camera, lighting, sound and the art department.
Person 2 and 3: They would split the roles of camera and lighting between each other, with one person filming and the other making sure the lighting was adequate. If there is no lighting required then they would be in charge of making sure the props were where they should be and making sure that they have the props with them.

Thursday, 6 January 2011

post 7- Creating your own script

Creating my script was perhaps one of the hardest tasks during this course. I found it hard to come up with a creditable idea that could be achieved in such a short amount of time, and also creating an idea that is also do-able with limited resources. It turned out the class were also having a problem deciding on their own script idea. Our teacher noticed that we were taking inspiration from very heavy social realist films, and decided that we needed to see a lighter film that was very simplistic in its roots. She reccomended that we watched 'Signs'.


After watching 'Signs' I began to realsie that dialgoue isn't totally an essential part of creating a script, as within 'Signs' there is no dialogue from the main characters, only from the supporting characters. The main characters talk to each other through writing and drawing on peices of paper. This would prove influential in my script writing as I aimed to be more creative and braoden my ideas.

My original idea was based upon two people, who had possibly had a relationship and then as the film progresses we realsie that one of them isn't real and is in fact trying to save the other from deperession. I always intended to have a twist at the end as I intended to leave the audience guessing until the end as to what their relationship is.


We were informed what to do when it came to creating a narrative. We were told a good place to get an idea about writing a script is to think about the end and then the begginning and finally working out what happens in the middle. We were also told to establish the characters and the world in which they live.
I decided to create my character profile first as it allowed me to work on the relationship between the characters. I decided that their relationship was one of childhood love. However I needed the main character 'Lucas' to have a dark side which would come back into his life within the film and that 'Kate' was his meaning in life and it was slowly going to fall to peices during the film.

I decided to have an outline for my plot as I believed that by establishing the plot I could elaborate from that and come up with ideas.


The film would establish the isolation that Lucas is feeling and how he is struggling to come to terms with what he has done. I also wanted to include Kate as much as possible so that the audience believed that she was real, when in fact she would be a ghost, who is trying to help Lucas forgive himself. The film would continue to watch Lucas as he doesn't believe she is there and that she is all in his mind. The plot would conclude with Lucas realising it isn't in his mind and she in fact trying to help him.

I was influenced by how in the short film 'Signs' the characters communicate through writting on paper. This gave me the idea of how Kate instead of engaging in full conversations with Lucas she could leave messages for him. From this I had the idea of using subtle messages instead of obvious messages. (Insert screengrabs of messages in film).
This gave me a problem of how to give across the subtle messages. I decided that because the film was entirely based in Lucas' house it should be objects you would find in a house. I concluded that we could manipulate leaflets to read out a message, and also use magnetic letters on a fridge.

From then on I knew what I intended to write and began writing my script based on this plotline and the ideas that I had produced from it.

Wednesday, 6 October 2010

Post 6: What makes a good short film ?

As this was our first ever making of a short film our school organised for Becky Knapp, a short film expert to attend a triple lesson we had and give us three lessons on what makes a good short film.


She began by showing us a variety of short films that she had worked on. After watching them we were told that short films vary depending on the length of them. If the films length is less than 5 minutes, it will normally have a 'jokey' plot and very stereotypical characters who don't elaborate on their character much if at all. Films that lasted between 5-12 minutes would have a more original plot and the characters would go through a journey of some sort. If the short film went from 12-30 minutes there would be more than one storyline and the characters would be unique and have multiple traits. We were told that directors, producers and script writers use short films as a stepping stone into to main feature length industry. To quote Becky Knapp- 'Short films are a show case of talent'.


She provided us with many scripts, some of which she herself has worked on. Two of the scripts she left were 'Donna' and 'Does God play football?'. When reading through these scripts I took a big liking to 'Does God play football?' as I liked the simplistic innocence to the main character and how his imagination and reality are quite different and how the voice over gives such a innocent insight into his character. By giving us these scripts we also had the layout for what our scripts should look like.
I was also very interested in 'On a life's edge'. I was really intrigued as to how you as an audience watching it make the assumption that the two main characters are police officers because of their behaviour. However the twist at the end makes the audience realise that they aren't police officers, but they are angels helping people through purgatory.


We were told that or target audience would be very narrow, as it is mainly film critics, short film festival audiences and media/ film students who watch short films therefore when creating our short film we were advised to try to appeal to that audience by making our genre of choice possibly one that is regularly viewed within that narrow audience. Becky also told us that when she reviews a script (especially first drafts) as well as many critics, they find that many of them try to put in too much information and have trouble conveying all that information in a short amount of time.


After Becky Knapps very helpful lesson I decided that I required a little bit more information as to what makes a good short film. I used the Internet and was amazed as to how much information there was on how to make a good short film.

The BBC at the time was doing a special review of short films and had written an article on what makes a good short film. http://www.bbc.co.uk/filmnetwork/filmmaking/guide/introduction/what-makes-a-good-short
They broke what makes a good short film down into 8 different sections to which I will briefly explain:


  1. An exciting and original idea: They advise that you should try to avoid cliche ideas and a way to get a original idea is to watch many more short films. They also talk about how you can draw inspiration from everyday things such as newspapers, television and even personal experiences.

  2. A strong script: In this section they confirmed what Becky said in that many scripts are packed too much with information and that a way to get a condensed script is to get as much feedback as possible.

  3. Good acting: This would be a vital piece of information as you don't want to cast someone who is terrible at acting as you want the acting to convey the messages you are trying to give across. If you have a bad actor it can ruin your perfectly good short film.

  4. High production values: This is where you have to ensure that even though your filming a short film you need to make sure sound, camera work, lighting and editing are of the best quality. They go on to say that too many films are ruined by bad quality.

  5. Keeping it short: This was basically a reminder that even though we are making short films the longer you make it the harder it is to keep the audiences attention.

  6. Strong beginning: To grab your audiences attention you have to make the beginning as interesting and engaging as possible. There is very little point in making all the engaging parts of the film at the end as the audience wont grasp it and not be as interested as they could be.

  7. Avoid repetition and punchline twists: They stressed that it is important not to become repetitive and that comedy is difficult to use in short films. I was then advised that if I was going to do comedy that I shouldn't leave the punchline until the end and that I should make them short and snappy.

  8. Exciting techniques and style: By using exciting techniques and style I can give my script a more interesting twist as it will add effect to the story and make the overall story much more interesting.

By using Becky Knapps knowledge and the advice by the BBC I had a through understanding as to what makes a good short film and applied this knowledge to my own script writting.