Understanding light and colour:
As we can see from this picture from 'Harry Potter' headlights are used to create the illusion that they are standing in a darkened street under and by some lampposts. By using soft lighting we as the audience assume there are lampposts nearby. The reflector is there to make sure no shadows take over the actors face and prevents the shadows from being dominant.
There are 3 main types of light that films use when applying artificial light.
 The second is FILL LIGHT. This is simply used to reduce the contrast of a scene and provide some illumination for the areas that have a shadow. This is normally perpendicular to the key light.
Using the three different lighting together is what makes up three point lighting. By using three point lighting the photographer can illuminate, control and add shadows to the subject, giving the photographer complete control on how they want to illuminate the subject.
 (From left to right: key lighting, fill lighting, back lighting.)
From this picture we can see that by using three point lighting this kettle is illuminated much better than by using the individual lighting.
Lighting and creating an atmosphere:


Here we have to different images, both trying to pu across different atmospheres. The image on the left uses very harsh lighting on the floor and walls, helping create distinctive harsh lines to the aresa just illuminated and also allows a slight diffusion, adding more to the errie scene. This would be something you would expect to see in a horror movie. The second image uses the reflection from the floor to illuminate the corridor, however because of the dark colour of the corridor walls the lighting doesnt do much to lighten the mood of the scene.From both of these pictures there are very different atmospheres emitted, with the lighting proving pivotal in creating the atmosphere.

Light and colour can be characterised through its source. The source is where the light comes from and the intensity and colour of both the light and colour is what gives the image its texture and depth and if used correctly it can create different moods within the image.
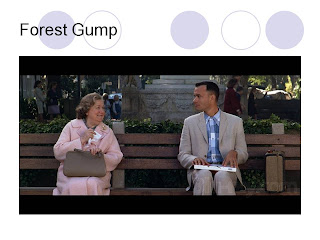

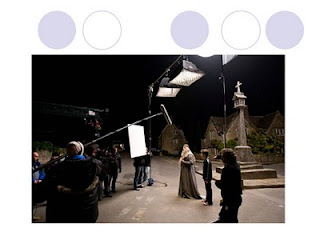
As we can see both images are very different in terms of lighting, with the image on the right using a lot of artificial light that is in front of the actors and aimed in their direction, whilst the image on the left uses very natural light with possible artificial light behind the horse in the background. With the image on the left the artificial light that is behind the horse is obstructed by the trees and the monument, making its effect very minimal. Because the light is majorly natural lighting there are no cast shadows or hard light resulting in a very soft light on the actors. The other image on the left is very different in terms of lighting. The hard lighting creates many attached shadows and loses the texture and detail from the shot, especially from Tom Hanks' suit where it dominates and drains colour from the shirt. Compared to the other image it has a much colder feel and texture to it.
It is a lot harder to use natural lighting regularly as the lighting always changes as the weather changes regularly. Therefore many films use artificial lighting to create continuity though out a scene in case the natural lighting does change throughout the filming.

As we can see from this picture from 'Harry Potter' headlights are used to create the illusion that they are standing in a darkened street under and by some lampposts. By using soft lighting we as the audience assume there are lampposts nearby. The reflector is there to make sure no shadows take over the actors face and prevents the shadows from being dominant.
There are 3 main types of light that films use when applying artificial light.
First is KEY LIGHT. The purpose of this is to highlight the form and dimension of the subject. It provides the most dominant illusion and normally casts the strongest shadows.
 The second is FILL LIGHT. This is simply used to reduce the contrast of a scene and provide some illumination for the areas that have a shadow. This is normally perpendicular to the key light.
There is also BACK LIGHT. Although not used often this is where the light and the audience are facing each other and the subject is in the middle. This can cause the subject to 'glow' whilst other areas remain darker.
Using the three different lighting together is what makes up three point lighting. By using three point lighting the photographer can illuminate, control and add shadows to the subject, giving the photographer complete control on how they want to illuminate the subject.
(From left to right: key lighting, fill lighting, back lighting.) From this picture we can see that by using three point lighting this kettle is illuminated much better than by using the individual lighting.
Lighting and creating an atmosphere:
As well as illuminating a subject, lighting also helps create an atmosphere in a scene. If you are trying to create a scene of happiness you will use lots of bright light, allowing lots of colour to flourish, rather than dark lighting. Special attention has to be taken when applying lighting and using it to create atmosphere as too much or too little can ruin a shot.
Here we have to different images, both trying to pu across different atmospheres. The image on the left uses very harsh lighting on the floor and walls, helping create distinctive harsh lines to the aresa just illuminated and also allows a slight diffusion, adding more to the errie scene. This would be something you would expect to see in a horror movie. The second image uses the reflection from the floor to illuminate the corridor, however because of the dark colour of the corridor walls the lighting doesnt do much to lighten the mood of the scene.From both of these pictures there are very different atmospheres emitted, with the lighting proving pivotal in creating the atmosphere.
After understanding how lighting helps create an atomsphere, as a class we performed an experiment using artificial light and natural light. We decided to shoot two different shots of the same scene, however one scene was artificical lighting and the other was natural lighting.
This was the final product-http://www.youtube.com/watch?v=EpDT6G1C6Gc
In one shot we used botht the artificial and natural lighting, then in the second we got rid of the natural lighting and used the artificial and manipulated it to create a different atmosphere to the shot. From the first shot you can tell that we are using as much light as we can get to illuminate the hallway and it looks like its a very sunny day thats getting reflected through windows.
The second shot however is completely different. We blocked out the natural light, which proved to eba slight probelm as the windows around the corner were hgue and required a few people to hold up sheets and block the sun. We then altered the brightness of the spot-lights on the ceiling and twisted them to face our subject. By doing this we had created a much more mysterious atmosphere, and by focusing the lights just above our subjects head it gave us shadows across the face and added to the tone of the scene.
We also learned that there is more you can do to lighting than by positioning and removing light, you can also add gels, filters and colours. 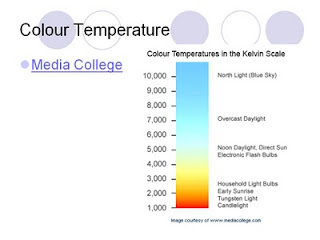 However when using this you must get the misture of light and the colour of gel or filter right. This is when the lighting technician uses the colour tempreture scale. This is what is used when the director is trying to balance out the light in the shot to get the reguired effect.
 However when using this you must get the misture of light and the colour of gel or filter right. This is when the lighting technician uses the colour tempreture scale. This is what is used when the director is trying to balance out the light in the shot to get the reguired effect.
 Another method of manipulating light is through gels. These are transparent coloured polyester or polycarbonate sheets plced over lights. They help change the feeling the light gives off. For example if you use a red gel the light will give off a warmer feel, whilst if you use a blue gel the feeleing will be colder. However this method is an expensive one and also requires a experienced team to work properly.

There is also the use of filters. This is when the light entering the camera lens is altered. Using a filter can sharpen, add colour, flare, affect contrast and the light intensity of an image. You can use filters individually or in a combination. On the left is a demonstration what happens to an image when applying red 85 filter. As we can see by applying the filter the image has become warmer. This is done by tricking the camera into thinking the light blue in the picture is white.
Finally there is also the application of colour. This is simply when a colour is placed over the image to change the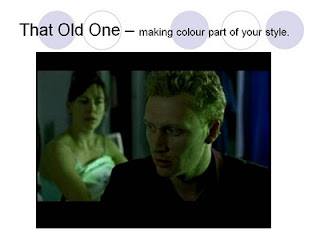 mood of it. As we can see in the image below the editors have placed a green tinge over the shot. This actually has relevance to the film as the green becomes a symbol of when the man lies to his wife. We see the green throughout all the scenaios in which he tries to come up with a good lie to tell his wife.
 mood of it. As we can see in the image below the editors have placed a green tinge over the shot. This actually has relevance to the film as the green becomes a symbol of when the man lies to his wife. We see the green throughout all the scenaios in which he tries to come up with a good lie to tell his wife.
No comments:
Post a Comment