Genre theory- Genre is what we as an audience classify a film as when we go see it. If we see a film that's very funny we would say that it falls into the comedy genre. If we see a film with lots of explosions and gun fights then we would say that the film falls into the action genre. By using genre in the development of a film the writers are able to use conventions that would normally be seen in certain films. They can however deviate from these conventions and make a new twist on the genre. A good example of this is Bad Boys. This is a action film that is very funny and is deemed to fall into the action comedy genre. By choosing a genre it allows a simpler marketing campaign to which the campaign can be tuned to meet the specific requirements to draw audiences in.
When applying genre theory to our own short film it was clear to us as a group that our short would in fact consist of two genres. These are psychological thriller and romance, with the psychological thriller being more dominant than the romance. When considering our audience and marketing we had to reflect on our genre and how because it is a mixture of two very different genres our audience could be divided. However upon reflection it would also work as a way of attracting a much larger audience, therefore using two genres is a very beneficial method of attracting a larger audience.
Audience Theory: This is where the audience are given a text and are free to interpret the text themselves. As the film makers we need to consider how our text will be read and the response it will recieve. We can apply audiene theory to our postcards. What the audiecne read into our postcards could influence their decision about seeing our short film.
Tuesday, 22 February 2011
Sunday, 13 February 2011
post 14 pre production documentation
The Script: This is used as a reference for all other documents within the pre production are based upon. It helps visualise the location, mood and character movement.


The Shotlist:
The Shotlist is a document which breaks down each individual shot and what happens in that shot.


The Shotlist:
The Shotlist is a document which breaks down each individual shot and what happens in that shot.


Location Recce: The Location Recce is a visual display of the location where the filming shall take place. It informs the director of where lighting comes from and any power sources originally there. The director would use this document to decide wether or not to use the location or wether they should use it but make minor changes.


Actor profiles: These documents are what are provided to the director when actors audition for the role in the project. It contains basic information sauch as hieght, name, date of birth and other details. It will then go to list their previous acting experience. There will then be two pictures. One is a close up of the actors face and the other will be a body shot. There is also the actors contact details, if it isnt the actors details than it will be the actors agency. With this information and an audition the casting director can narrow down potential actors for the part and pass this information to the director.


The character profile: This is a general overview of the characters including their backstory.

The storyboard: This is a visual drawing and partial direction for each shot. It contains information about the length of the shot, the size of the shot, what the camera and actor does in that shot and what sound if any is heard or going to be heard.


Post 13 advanced production workshop 3
Understanding light and colour:
As we can see from this picture from 'Harry Potter' headlights are used to create the illusion that they are standing in a darkened street under and by some lampposts. By using soft lighting we as the audience assume there are lampposts nearby. The reflector is there to make sure no shadows take over the actors face and prevents the shadows from being dominant.
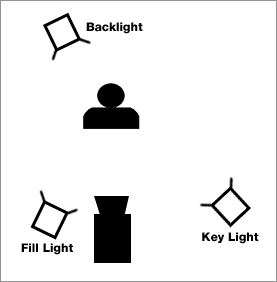
There are 3 main types of light that films use when applying artificial light.
 The second is FILL LIGHT. This is simply used to reduce the contrast of a scene and provide some illumination for the areas that have a shadow. This is normally perpendicular to the key light.
Using the three different lighting together is what makes up three point lighting. By using three point lighting the photographer can illuminate, control and add shadows to the subject, giving the photographer complete control on how they want to illuminate the subject.
 (From left to right: key lighting, fill lighting, back lighting.)
From this picture we can see that by using three point lighting this kettle is illuminated much better than by using the individual lighting.
Lighting and creating an atmosphere:


Here we have to different images, both trying to pu across different atmospheres. The image on the left uses very harsh lighting on the floor and walls, helping create distinctive harsh lines to the aresa just illuminated and also allows a slight diffusion, adding more to the errie scene. This would be something you would expect to see in a horror movie. The second image uses the reflection from the floor to illuminate the corridor, however because of the dark colour of the corridor walls the lighting doesnt do much to lighten the mood of the scene.From both of these pictures there are very different atmospheres emitted, with the lighting proving pivotal in creating the atmosphere.

Light and colour can be characterised through its source. The source is where the light comes from and the intensity and colour of both the light and colour is what gives the image its texture and depth and if used correctly it can create different moods within the image.
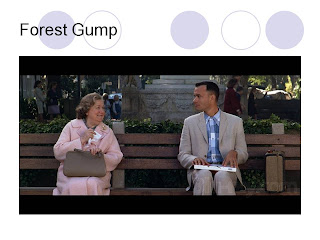

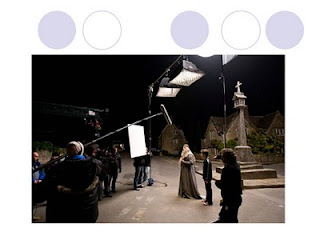
As we can see both images are very different in terms of lighting, with the image on the right using a lot of artificial light that is in front of the actors and aimed in their direction, whilst the image on the left uses very natural light with possible artificial light behind the horse in the background. With the image on the left the artificial light that is behind the horse is obstructed by the trees and the monument, making its effect very minimal. Because the light is majorly natural lighting there are no cast shadows or hard light resulting in a very soft light on the actors. The other image on the left is very different in terms of lighting. The hard lighting creates many attached shadows and loses the texture and detail from the shot, especially from Tom Hanks' suit where it dominates and drains colour from the shirt. Compared to the other image it has a much colder feel and texture to it.
It is a lot harder to use natural lighting regularly as the lighting always changes as the weather changes regularly. Therefore many films use artificial lighting to create continuity though out a scene in case the natural lighting does change throughout the filming.

As we can see from this picture from 'Harry Potter' headlights are used to create the illusion that they are standing in a darkened street under and by some lampposts. By using soft lighting we as the audience assume there are lampposts nearby. The reflector is there to make sure no shadows take over the actors face and prevents the shadows from being dominant.
There are 3 main types of light that films use when applying artificial light.
First is KEY LIGHT. The purpose of this is to highlight the form and dimension of the subject. It provides the most dominant illusion and normally casts the strongest shadows.
 The second is FILL LIGHT. This is simply used to reduce the contrast of a scene and provide some illumination for the areas that have a shadow. This is normally perpendicular to the key light.
There is also BACK LIGHT. Although not used often this is where the light and the audience are facing each other and the subject is in the middle. This can cause the subject to 'glow' whilst other areas remain darker.
Using the three different lighting together is what makes up three point lighting. By using three point lighting the photographer can illuminate, control and add shadows to the subject, giving the photographer complete control on how they want to illuminate the subject.
(From left to right: key lighting, fill lighting, back lighting.) From this picture we can see that by using three point lighting this kettle is illuminated much better than by using the individual lighting.
Lighting and creating an atmosphere:
As well as illuminating a subject, lighting also helps create an atmosphere in a scene. If you are trying to create a scene of happiness you will use lots of bright light, allowing lots of colour to flourish, rather than dark lighting. Special attention has to be taken when applying lighting and using it to create atmosphere as too much or too little can ruin a shot.
Here we have to different images, both trying to pu across different atmospheres. The image on the left uses very harsh lighting on the floor and walls, helping create distinctive harsh lines to the aresa just illuminated and also allows a slight diffusion, adding more to the errie scene. This would be something you would expect to see in a horror movie. The second image uses the reflection from the floor to illuminate the corridor, however because of the dark colour of the corridor walls the lighting doesnt do much to lighten the mood of the scene.From both of these pictures there are very different atmospheres emitted, with the lighting proving pivotal in creating the atmosphere.
After understanding how lighting helps create an atomsphere, as a class we performed an experiment using artificial light and natural light. We decided to shoot two different shots of the same scene, however one scene was artificical lighting and the other was natural lighting.
This was the final product-http://www.youtube.com/watch?v=EpDT6G1C6Gc
In one shot we used botht the artificial and natural lighting, then in the second we got rid of the natural lighting and used the artificial and manipulated it to create a different atmosphere to the shot. From the first shot you can tell that we are using as much light as we can get to illuminate the hallway and it looks like its a very sunny day thats getting reflected through windows.
The second shot however is completely different. We blocked out the natural light, which proved to eba slight probelm as the windows around the corner were hgue and required a few people to hold up sheets and block the sun. We then altered the brightness of the spot-lights on the ceiling and twisted them to face our subject. By doing this we had created a much more mysterious atmosphere, and by focusing the lights just above our subjects head it gave us shadows across the face and added to the tone of the scene.
We also learned that there is more you can do to lighting than by positioning and removing light, you can also add gels, filters and colours. 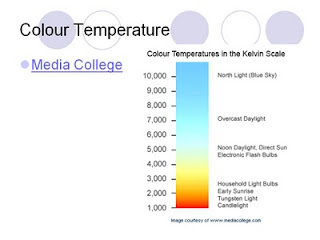 However when using this you must get the misture of light and the colour of gel or filter right. This is when the lighting technician uses the colour tempreture scale. This is what is used when the director is trying to balance out the light in the shot to get the reguired effect.
 However when using this you must get the misture of light and the colour of gel or filter right. This is when the lighting technician uses the colour tempreture scale. This is what is used when the director is trying to balance out the light in the shot to get the reguired effect.
 Another method of manipulating light is through gels. These are transparent coloured polyester or polycarbonate sheets plced over lights. They help change the feeling the light gives off. For example if you use a red gel the light will give off a warmer feel, whilst if you use a blue gel the feeleing will be colder. However this method is an expensive one and also requires a experienced team to work properly.

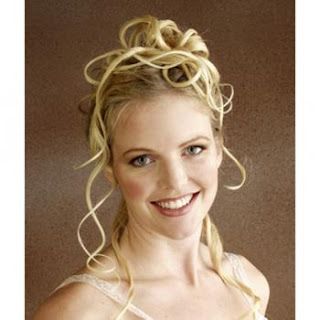
There is also the use of filters. This is when the light entering the camera lens is altered. Using a filter can sharpen, add colour, flare, affect contrast and the light intensity of an image. You can use filters individually or in a combination. On the left is a demonstration what happens to an image when applying red 85 filter. As we can see by applying the filter the image has become warmer. This is done by tricking the camera into thinking the light blue in the picture is white.
Finally there is also the application of colour. This is simply when a colour is placed over the image to change the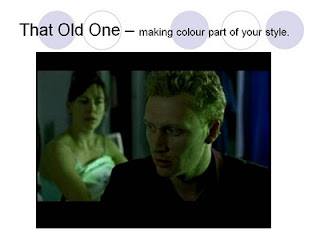 mood of it. As we can see in the image below the editors have placed a green tinge over the shot. This actually has relevance to the film as the green becomes a symbol of when the man lies to his wife. We see the green throughout all the scenaios in which he tries to come up with a good lie to tell his wife.
 mood of it. As we can see in the image below the editors have placed a green tinge over the shot. This actually has relevance to the film as the green becomes a symbol of when the man lies to his wife. We see the green throughout all the scenaios in which he tries to come up with a good lie to tell his wife.
Post 12 advanced production skills workshop 2
Quality experiment:
Quality in terms of lighting is how the intensity of the illumination effects the mood of the image and the visual impact it gives off. There are normally two distinctive qualities- Hard and Soft.
Hard lighting is a direct light that creates bold shadows, crisp texture and edges. This creates some very bright and dark areas within a shot and can give a very artificial look to the subject.

Even though this picture doesn't give of a artificial look, it still has distinctive bold shadows and distinctive lighting on the face.
 Soft lighting is indirect or diffused and blurs contours and textures. It creates a softer constrast between light and shade. As we can see from the image the light looks very natural and has very light shadows.


From both of these pictures we can see there is use of hard lighting, which isn't giving a lot of detail to the subject. If you look at the first picture we can see the intensity of the light and not much detail. We can just see the outline of the shoulder blades however the lighting is very dominant. The same can be said about the second picture with there being a lot of hard light and not much detail shown as a consequence.
This lead us onto our main experiment. We were told to allocate ourselves roles, however as there were only four of us we had to multi-task. The roles included:
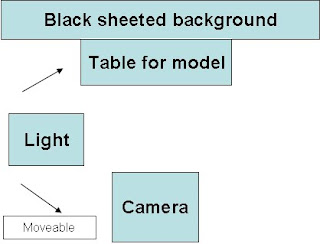
We also had a large amount of equipment for this experiment:
http://www.youtube.com/watch?v=jXIq6afyZsA&feature=related
The second clip is were we used barn doors on the actual light to direct the light, bounce the light off the ceiling, tin foil and white paper. We also used ventian blinds. These were created by cutting lines in some black card and then being held up to the light.
http://www.youtube.com/watch?v=1bm4kDecXLs
This is the third clip. This is where we applied Spot and Flood to the lighting.
http://www.youtube.com/watch?v=xXkmNhGYA-0
The fourth clip is where we changed direction of the light to see what difference it made to the shadow and subject.
http://www.youtube.com/watch?v=3YdFyF5wkoc&feature=related
After watching the Madonna music video, learning about the different types of light intensity and conducting our own experiment I can say that I have learned a great deal about how lighting affects the feel of a shot and the tone of the film as well. By using lighting affectivley on its own you can create a mood equal to possibly the dialogue that is actually spoken. The experiment had its own strengths in that we as a group learned different roles and learnt more about different roles and how they all work together within a film production. I think it will be very beneficial to think about lighting when it comes to filming our short film as it can help create different moods so easily.
Quality in terms of lighting is how the intensity of the illumination effects the mood of the image and the visual impact it gives off. There are normally two distinctive qualities- Hard and Soft.
Hard lighting is a direct light that creates bold shadows, crisp texture and edges. This creates some very bright and dark areas within a shot and can give a very artificial look to the subject.

Even though this picture doesn't give of a artificial look, it still has distinctive bold shadows and distinctive lighting on the face.
 Soft lighting is indirect or diffused and blurs contours and textures. It creates a softer constrast between light and shade. As we can see from the image the light looks very natural and has very light shadows.
There is also 'flag'. This is a material used to shield the camera lens from unwanted light.
As a class we were told to perform an experiment in which we tested different qualities of light to see what works best and looks the best and most effective. This would also help us in our short film as it would allow us to be more creative in our lighting. We began by looking at Madonnas music video 'vogue'. This music video was famous for using film noir style and using shadows to create the mood of the video.

From both of these pictures we can see there is use of hard lighting, which isn't giving a lot of detail to the subject. If you look at the first picture we can see the intensity of the light and not much detail. We can just see the outline of the shoulder blades however the lighting is very dominant. The same can be said about the second picture with there being a lot of hard light and not much detail shown as a consequence.
This lead us onto our main experiment. We were told to allocate ourselves roles, however as there were only four of us we had to multi-task. The roles included:
Director- Cameraman
- Clapper operator
- Recorder
- Gaffer
- The model

We also had a large amount of equipment for this experiment:
- Mini DV Camera
- Tripod
- Batteries
- Base Plate
- Tape
- 1x Lowel Pro 250w lamp
- 1x Stand
- Diffusion attachments
- Speed ring
- Black Sheet/Card
- Scissors
- Safety gloves
- Extension leads
Altogether we have 4 different shots in which we manipulate the intensity of the light and use different diffusions and lighting equipment to change the light.
This is the first clip. This shot included us using black sugar paper and diffusers to manipulate the lighting.http://www.youtube.com/watch?v=jXIq6afyZsA&feature=related
The second clip is were we used barn doors on the actual light to direct the light, bounce the light off the ceiling, tin foil and white paper. We also used ventian blinds. These were created by cutting lines in some black card and then being held up to the light.
http://www.youtube.com/watch?v=1bm4kDecXLs
This is the third clip. This is where we applied Spot and Flood to the lighting.
http://www.youtube.com/watch?v=xXkmNhGYA-0
The fourth clip is where we changed direction of the light to see what difference it made to the shadow and subject.
http://www.youtube.com/watch?v=3YdFyF5wkoc&feature=related
After watching the Madonna music video, learning about the different types of light intensity and conducting our own experiment I can say that I have learned a great deal about how lighting affects the feel of a shot and the tone of the film as well. By using lighting affectivley on its own you can create a mood equal to possibly the dialogue that is actually spoken. The experiment had its own strengths in that we as a group learned different roles and learnt more about different roles and how they all work together within a film production. I think it will be very beneficial to think about lighting when it comes to filming our short film as it can help create different moods so easily.
Subscribe to:
Posts (Atom)